
Sometimes, you just need to save some data into Google Sheets quickly and efficiently without going through the hassle of setting up Google’s Sheets API and SDK. If you’re looking for a fast and straightforward way to handle data storage in your Next.js 14 application, then this tutorial is for you!
In this guide, we’ll explore how to integrate Google Sheets with a Next.js 14 application. This powerful combination allows you to use Google Sheets as a simple backend for storing and retrieving data, making your Next.js application more dynamic and interactive.
Table of contents
- Setting Up Google Sheets and Apps Script
- Setting Up the Next.js 14 Application
- Building the Frontend
- Conclusion
Setting Up Google Sheets and Apps Script
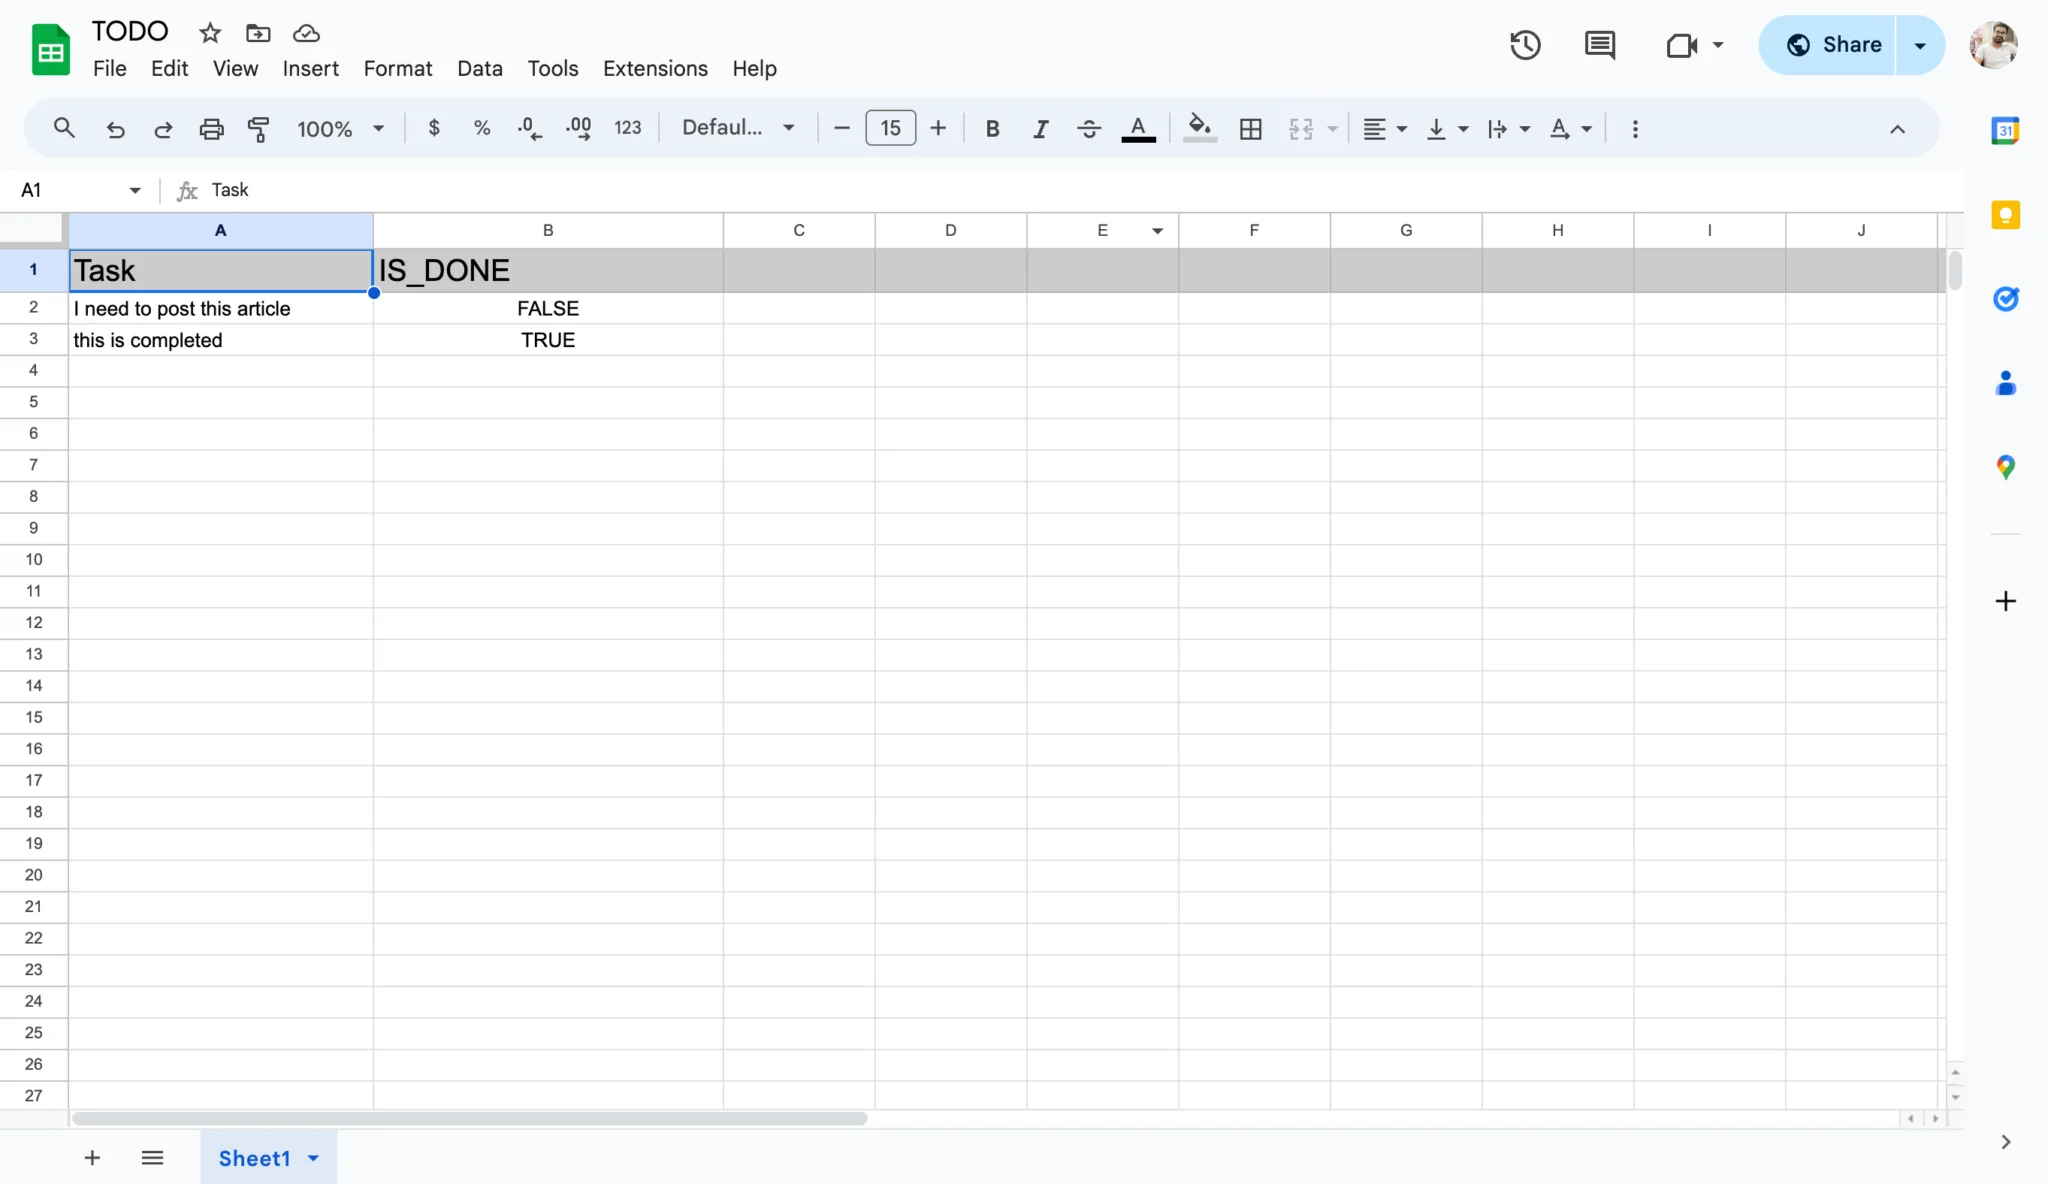
Step 1: Create a Google Sheet
- Open Google Sheets and create a new spreadsheet.
- Rename the first sheet to TODO for easy reference.
- Add headings:
TaskandIS_DONE.
Step 2: Create an Apps Script
- Click on Extensions in the menu and select Apps Script.
- Replace the default code with the following script.
const sheets = SpreadsheetApp.openByUrl("https://docs.google.com/spreadsheets/d/<UniqueId>/edit?gid=0#gid=0");
//if you have changed your sheet name then replace the below Sheet1 with your sheet name
const sheet = sheets.getSheetByName("Sheet1");
function doGet(e) {
var data = sheet.getDataRange().getValues();
return ContentService
.createTextOutput(JSON.stringify({
status: true,
message: "Fetched Successfully.",
data
}));
}
function doPost(e) {
const { task, is_done } = e.parameter;
sheet.appendRow([task, is_done]);
return ContentService
.createTextOutput(JSON.stringify({
status: true,
message: "Saved Successfully.",
data: e.parameter
}));
}- Replace
<UniqueId>with your sheet’s unique ID. - Save the script and deploy it as a web app.
- Click on Deploy > New Deployment.
- Select Web app and set the permissions to Anyone.
- Copy the Web app URL for use in your Next.js project.
Setting Up the Next.js 14 Application
Step 1: Create a New Next.js Project
- Open your terminal and create a new Next.js project:
npx create-next-app@14 google-sheets-nextjs
cd google-sheets-nextjsStep 2: Create API Functions
- Create a file
lib/api.tsand add the following code to handle API requests:
const API_URL = 'https://script.google.com/macros/s/<id>/exec';
export interface ITodo {
task: string,
is_done: boolean
}
export const fetchData = async (): Promise<ITodo[]> => {
try {
const response = await fetch(API_URL);
if (!response.ok) {
throw new Error('Network response was not ok');
}
const data = await response.json();
return data.data as ITodo[];
} catch (error) {
console.error('Error fetching data:', error);
return [];
}
};
export const addData = async (payload: FormData): Promise<ITodo[]> => {
try {
const response = await fetch(API_URL, {
method: "POST",
body: payload
});
if (!response.ok) {
throw new Error('Network response was not ok');
}
const data = await response.json();
return data.data as ITodo[];
} catch (error) {
console.error('Error adding data:', error);
return [];
}
};- Replace
<id>with your Web app ID from Apps Script.
Building the Frontend
Step 1: Create a Data Display Component
- Create a file
components/Todo.tsx.
import React from "react";
const Todo = ({ todos }: { todos: any[] }) => {
return (
<div>
{todos.length === 0 ? (
<p className="text-gray-500">No tasks found.</p>
) : (
<ul className="space-y-2">
{todos.slice(1).map(([task, is_done], index) => (
<li key={index} className="border border-gray-300 p-2 rounded">
<span className={`task ${is_done ? "line-through" : ""}`}>
{task}
</span>
</li>
))}
</ul>
)}
</div>
);
};
export default Todo;Step 2: Fetch Data and Display in Home Page
- Update the
app/page.tsx.
"use client";
import { useEffect, useState } from "react";
import { addData, fetchData, ITodo } from "./api";
import Todo from "./components/Todo";
export default function Home() {
const [todos, setTodos] = useState<any[]>([]);
const [form, setForm] = useState<ITodo>({
task: "",
is_done: false
});
const [loading, setLoading] = useState(false);
useEffect(() => {
const getData = async () => {
setLoading(true);
try {
const data = await fetchData();
setTodos(data);
} catch (error) {
console.error("Error fetching data:", error);
} finally {
setLoading(false);
}
};
getData();
}, []);
const handleSubmit = async (e: any) => {
e.preventDefault();
setLoading(true);
try {
const formData = new FormData();
formData.append('task', form.task);
formData.append('is_done', form.is_done ? 'true' : 'false');
await addData(formData);
const updatedData = await fetchData();
setTodos(updatedData);
setForm({ task: "", is_done: false });
} catch (error) {
console.error("Error adding data:", error);
} finally {
setLoading(false);
}
};
return (
<div className="container mx-auto p-4">
<h1 className="text-2xl font-bold mb-4">Next.js 14 with Google Sheets</h1>
<Todo todos={todos} />
{loading && (
<div className="fixed inset-0 flex items-center justify-center bg-gray-100 bg-opacity-50">
<div className="bg-white p-4 rounded shadow-md">Loading...</div>
</div>
)}
<form onSubmit={handleSubmit} className="mt-4">
<div className="flex flex-col space-y-2">
<input
type="text"
value={form.task}
onChange={(e) => setForm({ ...form, task: e.target.value })}
placeholder="Task"
className="border border-gray-300 p-2 rounded w-full"
/>
<label className="flex items-center space-x-2">
<input
type="checkbox"
checked={form.is_done}
onChange={(e) => setForm({ ...form, is_done: e.target.checked })}
className="form-checkbox"
/>
<span className="text-sm">Completed</span>
</label>
<button
type="submit"
className="bg-blue-500 text-white p-2 rounded"
disabled={loading}
>
Add Task
</button>
</div>
</form>
</div>
);
}- Update
gloabl.css.
@tailwind base;
@tailwind components;
@tailwind utilities;Now run npm run dev
and open http://localhost:3000/
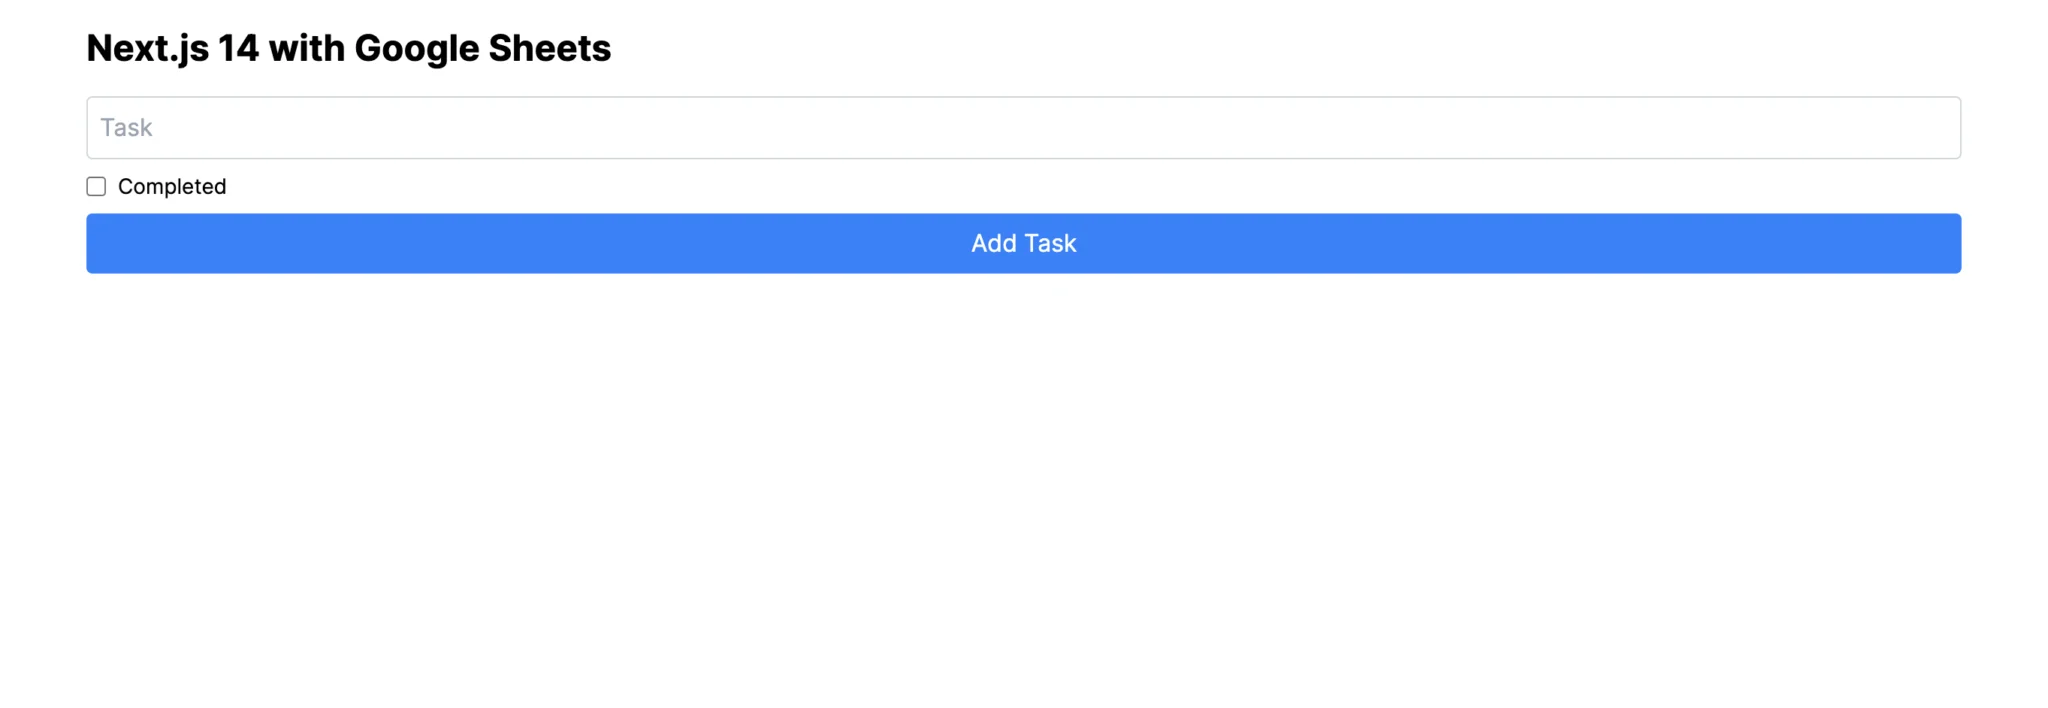
It should look like something this.
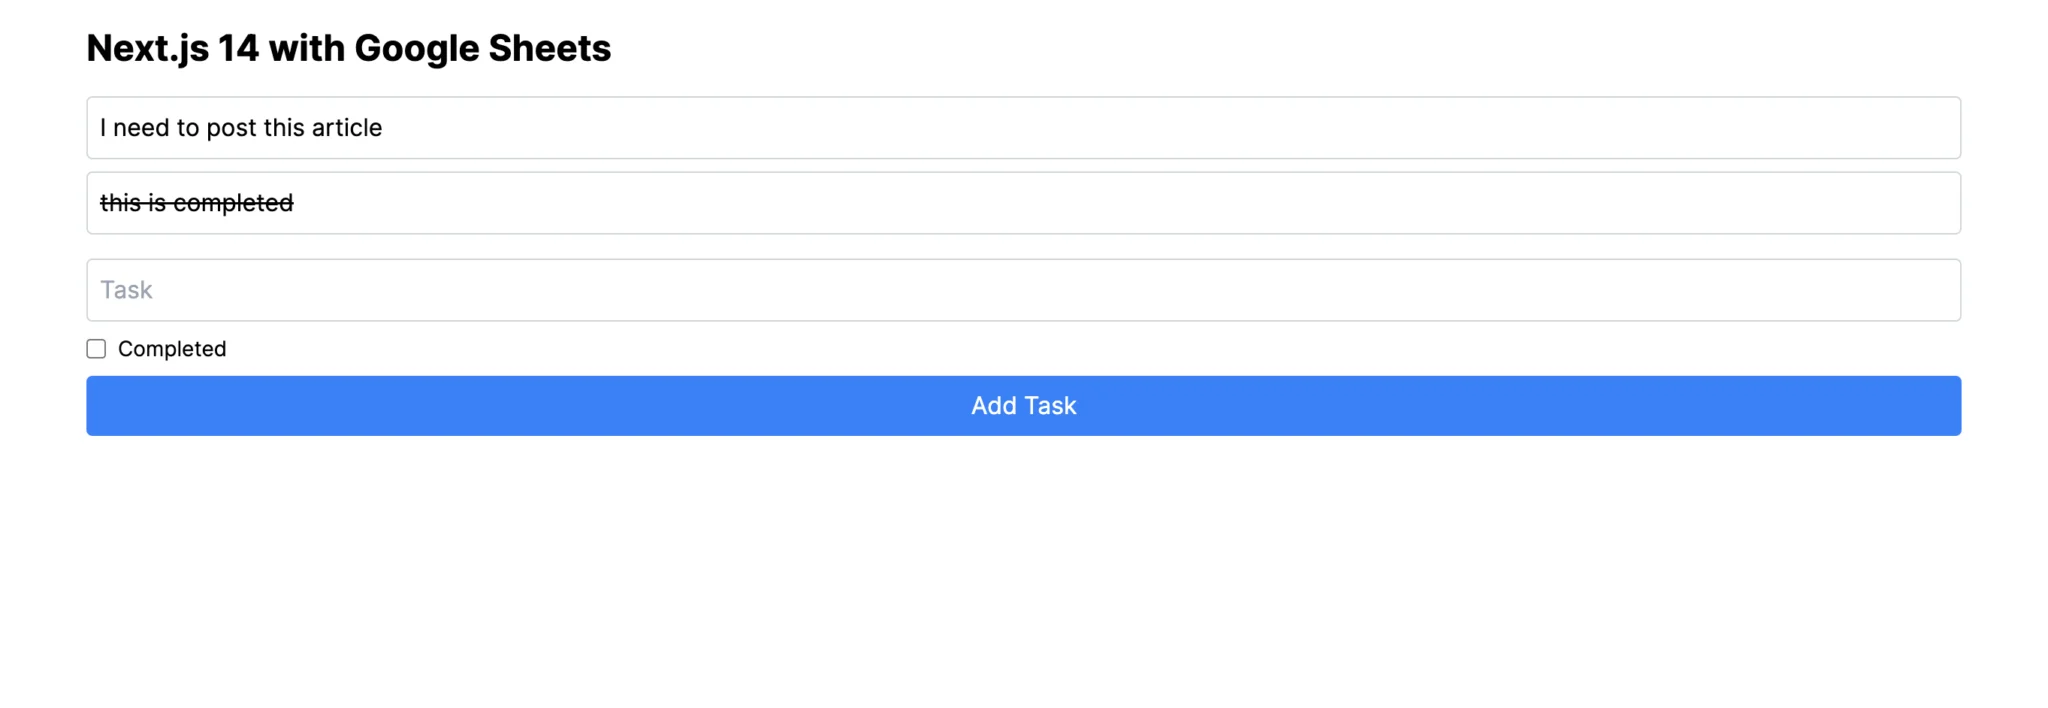
It will add data realtime like below.
Your app should look like this
Conclusion
By following these steps, you’ve successfully integrated Google Sheets with a Next.js 14 application using Google Apps Script.