
Managing Roles and permissions in your Next js 14 application is crucial for controlling access to various parts of your app. This article provides a high-level overview, allowing you to implement these concepts regardless of the authentication method or database you are using. For a detailed, step-by-step guide, stay tuned for our in-depth article.
We’ll cover how to implement Role-Based Access Control (RBAC) in your Next js 14 application. The focus will be on:
- Protecting Pages and Components: Learn how to restrict access to specific pages or components based on user roles and permissions.
- Using a Guard Component: Implement a component that conditionally renders content based on the user’s permissions.
- Helper Functions for Permission Management: Utilize functions to fetch user permissions and check for specific access rights.
- What Needs to be Protected:
- Pages: Restrict access to certain routes based on the user’s role and permissions.
- Components: Show or hide components depending on whether the user has the required permissions.
Table of contents
Database Structure
To get started, you’ll need to set up your database with the following tables:
- users
- roles
- permissions
- role_permissions
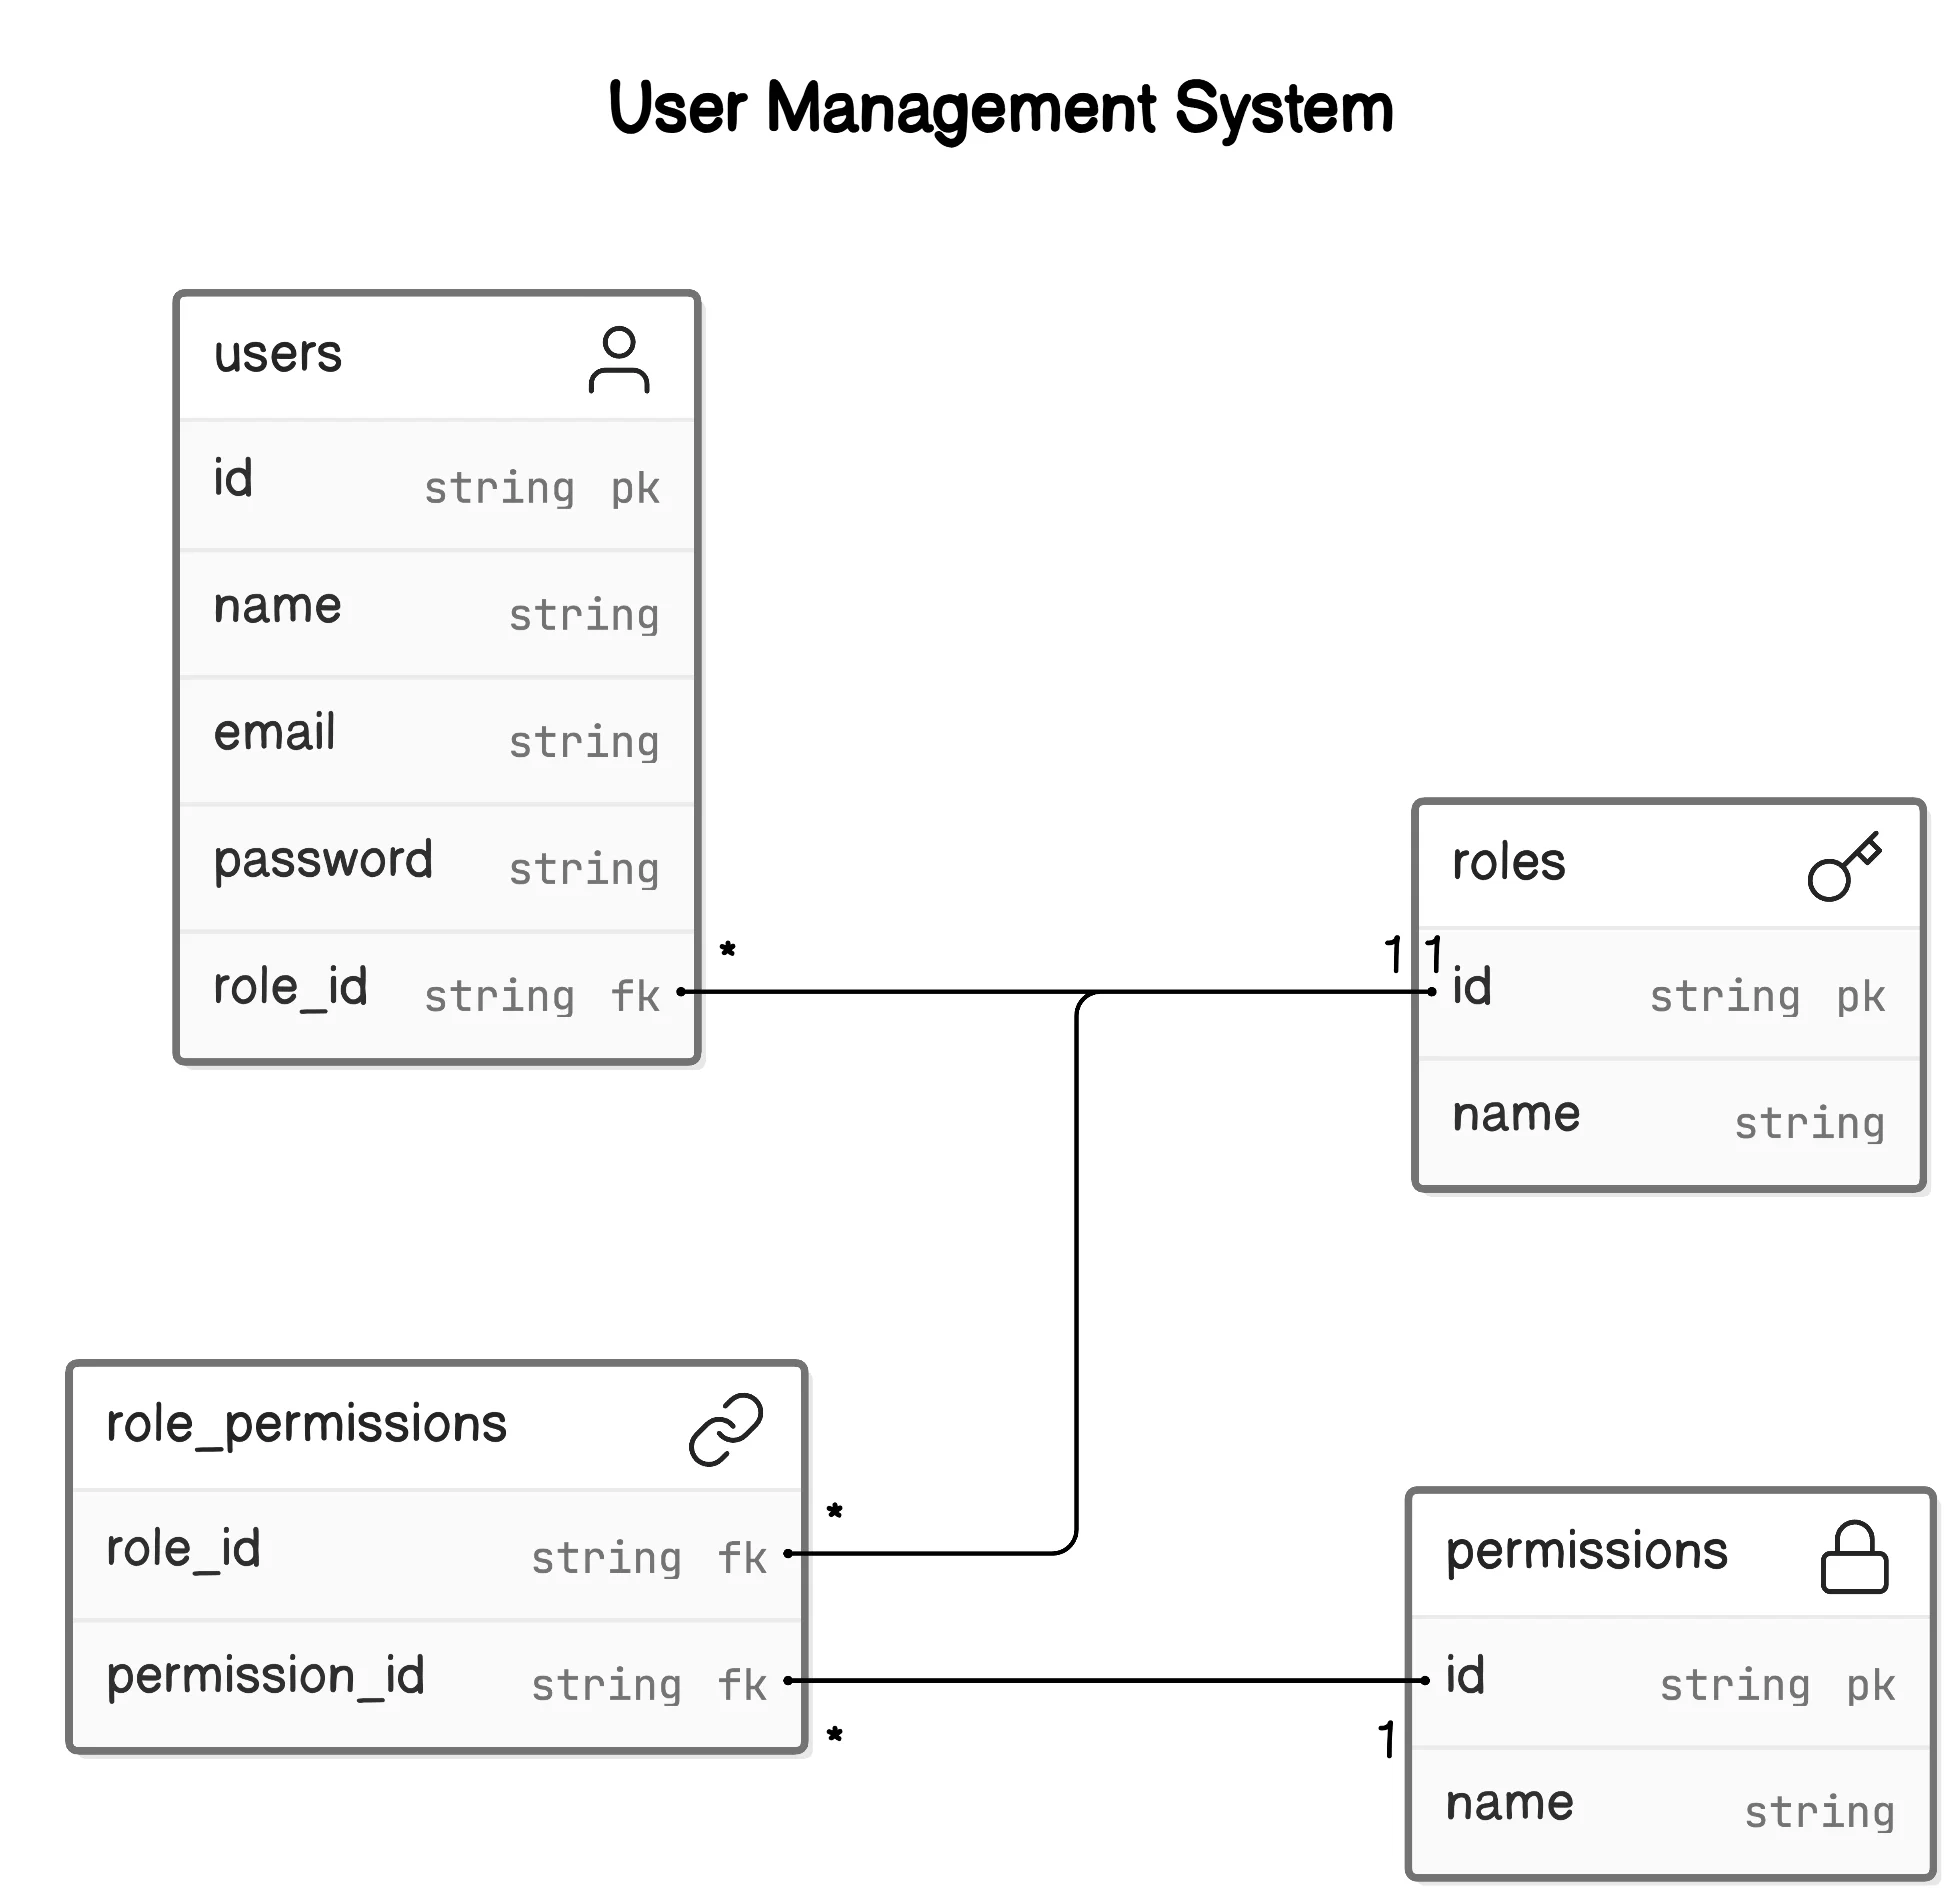
You can use any database to store this data. Here’s the basic idea:
- Users table: Each user can have one role.
- Roles table: Roles can have many permissions.
- Role_Permissions table: This pivot table links roles to permissions.
Here’s a basic example of inserting roles and permissions:
const roles = await db.insert(Schema.rolesTable).values([
{ name: 'admin' },
{ name: 'editor' },
{ name: 'user' },
]).returning();
const permissions = await db.insert(Schema.permissionsTable).values([
{ name: 'post-list' },
{ name: 'post-create' },
{ name: 'post-edit' },
{ name: 'post-delete' }
]).returning();
const getRoleId = (roleName) => {
const role = roles.find(role => role.name === roleName);
if (!role) {
throw new Error(`Role ${roleName} not found`);
}
return role.id;
};
const getPermissionId = (permissionName) => {
const permission = permissions.find(permission => permission.name === permissionName);
if (!permission) {
throw new Error(`Permission ${permissionName} not found`);
}
return permission.id;
};
const rolePermissions = [
{ role_id: getRoleId('admin'), permission_id: getPermissionId('post-list') },
{ role_id: getRoleId('admin'), permission_id: getPermissionId('post-create') },
{ role_id: getRoleId('admin'), permission_id: getPermissionId('post-edit') },
{ role_id: getRoleId('admin'), permission_id: getPermissionId('post-delete') },
{ role_id: getRoleId('editor'), permission_id: getPermissionId('post-create') },
{ role_id: getRoleId('editor'), permission_id: getPermissionId('post-edit') },
{ role_id: getRoleId('user'), permission_id: getPermissionId('post-list') }
];
await db.insert(Schema.rolePermissionsTable).values(rolePermissions);
await db.insert(Schema.usersTable).values([
{ name: 'Admin', email: 'admin@example.com', password: await makePassword('password'), role_id: getRoleId('admin') },
{ name: 'Editor', email: 'editor@example.com', password: await makePassword('password'), role_id: getRoleId('editor') },
{ name: 'User', email: 'user@example.com', password: await makePassword('password'), role_id: getRoleId('user') }
]);Implementing Role-Based Access Control
- Define a list of permissions in a constant file:
export const permissionList = {
POST_SHOW: 'post-list',
POST_CREATE: 'post-create',
POST_EDIT: 'post-edit',
POST_DELETE: 'post-delete'
// add more as per need, it should match with permissions table names
};Guard Component
- create a Guard component to hide and show child components based on the logged-in user’s permissions:
"use server";
import { getMyPermissions } from "@/server/queries/user";
import { ReactNode } from "react";
interface GuardProps {
permissions: string[];
children: ReactNode;
}
export default async function Guard({ permissions, children }: GuardProps) {
const myPermissions = await getMyPermissions();
const hasPermissions = permissions.every(permission =>
myPermissions.some(x => x.permissionName === permission)
);
if (!hasPermissions) {
return null;
}
return (
<>
{children}
</>
);
}- This is a server component, so it won’t show any UI shift on the frontend and it is more secure as it is server side.
Usage
<Guard
permissions={[permissionList.POST_DELETE]}
>
<Button>
Delete Post
</Button>
</Guard>Like this you can hide.
- Now you need to protect route as well right let cover this as well.
Helper Functions
To fetch permissions for the logged-in user:
"use server";
export const getMyPermissions =async () => {
const session = await auth(); // next-auth
if (!session?.user?.role_id) {
throw new Error("Role id not found in session.");
}
const permissions = await db
.select({
permissionName: permissionsTable.name
})
.from(rolePermissionsTable)
.innerJoin(permissionsTable, eq(rolePermissionsTable.permission_id, permissionsTable.id))
.where(eq(rolePermissionsTable.role_id, session.user.role_id));
return permissions;
};- To check if the user has a specific permission:
"use server"
import { getMyPermissions } from "@/server/queries/user";
import { cache } from "react";
export const hasPermission = cache(async (permissions) => {
const myPermissions = await getMyPermissions();
return permissions.every(permission =>
myPermissions.some(x => x.permissionName === permission)
);
});Protect Pages and redirect
import { permissionList } from '@/utils/constants';
import { hasPermission } from '@/utils/guard';
import { redirect } from 'next/navigation';
import React from 'react';
export default async function UserPage() {
const permission = await hasPermission([permissionList.POST_SHOW]);
if (!permission) {
return redirect('/');
}
return (
<div>You have User page access</div>
);
}Conclusion
This is a high-level overview of how you can set up roles and permissions in a Next js application. You can use this setup no matter what authentication method or database you are using. For a detailed, step-by-step guide, Click here
By following these basic steps, you can ensure that your Next js application has a robust role and permission management system.
Github url https://github.com/Kamleshpaul/nextjs-role-and-permission